2021. 1. 20. 16:52ㆍServer


이번에는 홈서버를 클라우드처럼 만들어줄 NextCloud를 우분투 서버에 설치해보도록 합시다. 서버에 설치해서 사용할 수 있는 클라우드의 종류는 Pydio, ownCloud, NextCloud, Seafile 등 NextCloud 외에도 많이 있습니다만, ownCloud와 NextCloud가 UI도 더 좋고 빠르다고 들어 고민했었습니다.
하지만, NextCloud는 ownCloud의 핵심 개발자들이 ownCloud를 빠져나와 해당 오픈소스 리포를 포크 하여 추가적으로 개발한 버전입니다. 덕분에 ownCloud의 기본 기능은 그대로 가지고 있고, 기본 ownCloud보다 부가 기능이 더욱 많으며, 모바일 앱 또한 ownCloud의 유료 앱과는 달리 무료입니다.
그리하여 NextCloud를 설치하여 홈서버에 클라우드 기능까지 추가해 보도록 합시다.
Snap을 사용해 NextCloud를 쉽게 설치하기
Ubuntu 18.04 LTS (Bionic Beaver) 및 Ubuntu 20.04 LTS (Focal Fossa)를 포함하여 Ubuntu 16.04 LTS (Xenial Xerus) 이상을 사용하는 경우 이미 Snap이라는 시스탬을 이용하여 NextCloud를 엄청나게 쉽게 설치할 수 있습니다. 설치에 필요한 명령어가 3줄 이하면 될 정도로 쉬우니, 혹시 이런 작업에 익숙하지 않으시다면 사용해보세요. Snap을 사용하던 직접 설치하던 별 차이는 없습니다.
[Server] 미니 홈서버 구축하기 11편 - NextCloud 쉽게 설치하기 (Snap 버전)
Snap은 Linux 커널을 사용하는 운영 체제를 위해 Canonical에서 개발 한 소프트웨어 패키징 및 배포 시스템입니다. apt와 비슷한 개념이지만 Snap은 응용 프로그램뿐만 아니라 해당 프로그램이 사용하
nitr0.tistory.com
설치하기
지금까지 설치했던 것과는 달리 같이 설치해줘야 하는 것이 굉장히 많고 복잡합니다. 천천히 설치해나가도록 해봅시다.
Apache 설치
sudo apt install apache2sudo service apache2 restart
sudo service apache2 status
구동에 필요한 Apache2를 설치하고 서비스를 재시작해줍니다.
sudo ufw allow 80
sudo ufw allow 443
Apache의 원활한 구동을 위해 UFW에서 80번과 443번의 포트를 허용해줍니다.

그리고 http://<Server IP>:80에 접속해보시면 위와 같은 창이 나타나는 것을 보실 수 있습니다.
MariaDB 설치하기
DB를 설치해봅시다.
sudo apt-get install mariadb-server mariadb-client php-mysqlsudo service mariadb restart
sudo service mariadb statusMariaDB도 마찬가지로 설치하고 재시작해줍니다.
sudo mysql_secure_installation위의 명령어를 입력하여 DB의 보안을 조금 강화시켜줍시다.
NOTE: RUNNING ALL PARTS OF THIS SCRIPT IS RECOMMENDED FOR ALL MariaDB
SERVERS IN PRODUCTION USE! PLEASE READ EACH STEP CAREFULLY!
In order to log into MariaDB to secure it, we'll need the current
password for the root user. If you've just installed MariaDB, and
you haven't set the root password yet, the password will be blank,
so you should just press enter here.
Enter current password for root (enter for none): (Root 비밀번호 확인) 아무것도 입력하지 말고 그냥 앤터
OK, successfully used password, moving on...
Setting the root password ensures that nobody can log into the MariaDB
root user without the proper authorisation.
Set root password? [Y/n] (비밀번호 바꿀 것인지) y
New password: (비밀번호)
Re-enter new password: (비밀번호 확인)
Password updated successfully!
Reloading privilege tables..
... Success!
By default, a MariaDB installation has an anonymous user, allowing anyone
to log into MariaDB without having to have a user account created for
them. This is intended only for testing, and to make the installation
go a bit smoother. You should remove them before moving into a
production environment.
Remove anonymous users? [Y/n] y
... Success!
Normally, root should only be allowed to connect from 'localhost'. This
ensures that someone cannot guess at the root password from the network.
Disallow root login remotely? [Y/n] y
... Success!
By default, MariaDB comes with a database named 'test' that anyone can
access. This is also intended only for testing, and should be removed
before moving into a production environment.
Remove test database and access to it? [Y/n] y
- Dropping test database...
... Success!
- Removing privileges on test database...
... Success!
Reloading the privilege tables will ensure that all changes made so far
will take effect immediately.
Reload privilege tables now? [Y/n] y
... Success!
Cleaning up...
All done! If you've completed all of the above steps, your MariaDB
installation should now be secure.
Thanks for using MariaDB!
위와 같이 처음 비밀번호만 알아서 설정하고 나머지는 다 y 입력해주시면 됩니다.
NextCloud DB 설정하기
sudo mysql -u root -p위의 명령어를 입력하고 아까 설정한 비밀번호를 사용하여 MariaDB에 접속해줍니다.
create database nextcloud;그리고 나서 위의 명령어를 이용하여 nextcloud라는 DB를 만들어줍니다.
create user nextclouduser@localhost identified by '비밀번호';nextclouduser라는 계정을 만들고 비밀번호를 입력해줍니다. ' 표시는 포함시켜서 입력해주셔야 합니다.
grant all privileges on nextcloud.* to nextclouduser@localhost identified by '비밀번호';그 후 권한을 nextcloud에게 넘겨줍니다.
flush privileges;
exit;
저장하고 종료하면 DB 관련은 끝입니다!
PHP 7.4 설치하기
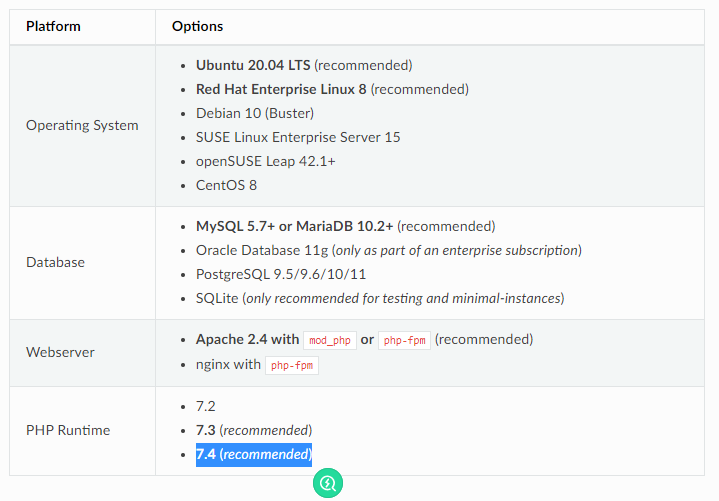
sudo apt install php-imagick libapache2-mod-php7.4 php7.4-common php7.4-mysql php7.4-fpm php7.4-gd php7.4-json php7.4-curl php7.4-zip php7.4-xml php7.4-mbstring php7.4-bz2 php7.4-intl php7.4-bcmath php7.4-gmpPHP를 7.4 버전으로 설치해줍니다. PHP의 버전은 설치할 NextCloud버전에 따라 다른데, 이곳에서 확인하시면 됩니다.
sudo vi /etc/php/7.4/apache2/php.ini위의 명령어를 통하여 php 설정 파일을 열어줍니다. 그럼 기본적으로 무언가 많이 적혀있어야 하는데, 그중에서 몇까지를 변경해줘야 합니다.
;로 시작하는 항목들이 많습니다. ;로 시작하는 줄들은 주석처리가 되어있어서 다른 색상 (여기서는 파란색)으로 표기되어 있습니다. 수정할 값이 주석 처리되어있다면 ;을 지우고 값을 변경해줍니다.
| Item | Value |
| output_buffering | Off |
| memory_limit | 512M |
| upload_max_filesize | 2048M |
| opcache.enable | 1 |
| opcache.enable_cli | 1 |
| opcache.memory_consumption | 128 |
| opcache.interned_strings_buffer | 8 |
| opcache.max_accelerated_files | 10000 |
| opcache.revalidate_freq | 1 |
| opcache.save_comments | 1 |
위의 항목들을 찾아 해당 값으로 변경해주시면 됩니다. opcache.enable은 [opcache] 아래에 enable을 뜻하는 것입니다.


sudo service apache2 restart서비스를 재시작해줍니다.
NextCloud 설치하기
sudo apt install curl git
curl -sS https://getcomposer.org/installer | sudo php -- --install-dir=/usr/local/bin --filename=composer
먼저 git, curl을 설치해주고, composer또한 설치해줍니다.
이제 다운로드할 버전을 찾아야 하는데,
https://nextcloud.com/install/#instructions-server
위의 링크에 들어가 줍니다.

여기서 안정화된 최신 버전을 확인해줍니다.
그 뒤 아래의 링크로 접속합니다.
https://github.com/nextcloud/server
nextcloud/server
☁️ Nextcloud server, a safe home for all your data - nextcloud/server
github.com

master라고 되어있는 버튼을 눌러서 stable이라고 되어있는 게 나올 때까지 스크롤합니다. 제 기준 최신 버전인 stable20을 확인합니다.
cd /var/www/html
sudo git clone --branch stable20 https://github.com/nextcloud/server.git nextcloud
cd /var/www/html/nextcloud
sudo composer install
sudo git submodule update --init
*본인이 설치하고 싶은 버전에 맞춰서 stable20을 변경해줍니다.*
위의 명령어를 입력하여 설치를 진행합니다.

sudo chown -R www-data:www-data /var/www/html/nextcloud
sudo chmod -R 775 /var/www/html/nextcloud
정상 구동을 위해 권한 설정도 해줍니다.
Apache 설정하기
sudo vi /etc/apache2/sites-available/nextcloud.conf위의 명령어를 통해 설정 파일을 열어줍니다.
<VirtualHost *:80>
    ServerAdmin 이메일주소
    DocumentRoot /var/www/html/nextcloud/
    ServerName 서버 아이피 또는 URL

  	ErrorLog ${APACHE_LOG_DIR}/error.log
    CustomLog ${APACHE_LOG_DIR}/access.log combined

    Alias /nextcloud "/var/www/html/nextcloud/"

    <Directory /var/www/html/nextcloud/>
        Options +FollowSymlinks
        AllowOverride All
        Require all granted
            <IfModule mod_dav.c>
                Dav off
            </IfModule>
        SetEnv HOME /var/www/html/nextcloud
        SetEnv HTTP_HOME /var/www/html/nextcloud
    </Directory>

</VirtualHost>
그리고 위의 내용을 복사하여 붙여 넣어줍니다.
sudo a2ensite nextcloud.conf
sudo a2enmod rewrite headers env dir mime setenvif ssl
변경된 설정 파일을 활성화시켜주고,
sudo service apache2 restart마지막으로 서비스를 다시 한번 재시작해줍니다.
다시 한번 http://<Server IP>/nextcloud에 접속해주면,

이런 화면이 나오게 됩니다. 적당히 입력해주고 아래 데이터베이스에는 아까 입력했던 유저 아이디와 비밀번호, DB 이름들을 입력해줍니다.
그럼 NextCloud를 사용하실 수 있습니다!
Troubleshooting
이 글을 따라 하시면서 NextCloud 관련 오류들이 발생할 수 있습니다. 오류들은 버전에 따라, 서버 종류와 OS에 따라, 다른 모듈들에 따라 발생할 수 있으며, 종류가 다양합니다. 제가 도와드릴 수 있는 범위 내에서는 도와드리겠지만, 직접 오류 내용을 구글에서 찾아서 해결하시는 것이 더 빠를 수 있습니다.
오류 로그는 아래의 명령어를 통하여 확인하실 수 있습니다.
cat /var/log/apache2/error.log
NextCloud가 재일 설치하기 힘든 서비스였던 것 같습니다. 이번 글에는 설치까지만 했지만, 아마 앞으로 진행하면서 도매인 연결, HTTPS 지원, OTP, 외장하드, SMB 연결 등 여러 가지 기능을 추가해보도록 합시다.
다음에는 아마 외장하드 연결하는 것부터 시작해보도록 하겠습니다.
참고한 글
https://docs.nextcloud.com/server/latest/admin_manual/installation/source_installation.html
Installation on Linux — Nextcloud latest Administration Manual latest documentation
In case you prefer installing from the source tarball, you can setup Nextcloud from scratch using a classic LAMP stack (Linux, Apache, MySQL/MariaDB, PHP). This document provides a complete walk-through for installing Nextcloud on Ubuntu 18.04 LTS Server w
docs.nextcloud.com
https://www.linuxbabe.com/ubuntu/install-nextcloud-ubuntu-20-04-apache-lamp-stack
Install NextCloud on Ubuntu 20.04 with Apache (LAMP Stack) - LinuxBabe
This tutorial will be showing you how to install NextCloud on Ubuntu 20.04 LTS with Apache web server. Ditch Dropbox and take back your online privacy with open-source cloud storage.
www.linuxbabe.com
https://yorublog.tistory.com/35
Ubuntu에 NextCloud로 개인 클라우드 구축하기
저번 글에서 Owncloud를 설치하였지만 모바일 앱이 유료인게 아쉽고, 확장 기능들이 많이 없어서 Owncloud에서 파생되어 기능이 많아진 NextCloud를 설치하기로 하였다. 잡다한 이야기 Apache2, MariaDB 및 P
yorublog.tistory.com
https://help.nextcloud.com/t/howto-install-nextcloud-20-on-ubuntu-20-04-1-the-classic-way-wiki/98755
Howto Install NextCloud 20 on Ubuntu 20.04.1 The classic way [Wiki]
Hopefully this helps you with an installation of NextCloud. This text is created here in the forum with the text editor of the forum. Although I have tried to be precise, use at your own risk, there can be typos and mistakes!!! During this writing (10-10-2
help.nextcloud.com
저도 설치하는 데에 도움이 많이 되었습니다.. ( •̀ ω •́ ) b

'Server' 카테고리의 다른 글
| [Server] 미니 홈서버 구축하기 11편 - NextCloud 쉽게 설치하기 (Snap 버전) (3) | 2021.01.29 |
|---|---|
| [Server] 미니 홈서버 구축하기 10편 - 외장하드 포맷, 자동 마운트 설정하기 (0) | 2021.01.24 |
| [Server] 미니 홈서버 구축하기 8편 - 토렌트 머신 (qBittorrent) 설치하기 (1) | 2021.01.16 |
| [Server] 미니 홈서버 구축하기 7편 - Google OTP를 이용하여 SSH 보안 강화하기 (5) | 2021.01.14 |
| [Server] 미니 홈서버 구축하기 6편 - fail2ban 으로 SSH 보안 강화하기 (0) | 2021.01.13 |